Discover my mother-in-law’s secret gluten-free challah recipe that’s perfectly braided, golden, and tender. Tastes so authentic, no one will believe it’s gluten-free.
INTRODUCTION
My mother-in-law taught me the art of challah—the feel of the dough, the rhythm of the braid, the pride of pulling a golden loaf from the oven. But when I needed to bake gluten-free, we faced a new challenge together. After many trials, countless tweaks, and more than a few dense bricks, we finally perfected it. This gluten-free challah recipe is the result of our collaboration.
This rich, golden, slightly sweet braided bread is so soft, tender, and delicious that you truly won’t believe it’s gluten-free. The secret? A combination of the right flour blend, a magical ingredient called psyllium husk, and a genius cold-rise method that makes the dough actually workable—something every gluten-free baker knows is half the battle.
Whether you’re gluten-free by necessity or choice, you deserve challah that tastes like the real thing. You deserve bread that braids beautifully, rises proudly, and fills your home with that unmistakable aroma. This is that recipe.
THE HISTORY: A Tradition Reimagined
The Ancient Roots of Challah
Challah is one of the oldest and most symbolic breads in Jewish tradition. According to My Jewish Learning, the name itself comes from the biblical commandment to separate a portion of dough (“challah”) as a tithe for the priests in the Temple of Jerusalem. This mitzvah, known as hafrashat challah, connects every loaf baked today to millennia of Jewish practice.
For centuries, this enriched, eggy bread has marked the beginning of Shabbat and holidays. The two loaves served on Friday night represent the double portion of manna that fell from heaven during the Israelites’ desert wanderings. As Chabad.org explains, this ensured the people wouldn’t have to gather food on the Sabbath day.
The Language of the Braid
The braids themselves carry deep meaning. A six-strand braid is said to represent the twelve loaves of showbread that were displayed in the Holy Temple. Other shapes mark special occasions: a round challah for Rosh Hashanah symbolizes the cycle of the year, while a braided loaf studded with poppy seeds represents the manna from heaven.
Every time you braid challah, you’re participating in a tradition that has connected Jewish families for generations. You’re weaving not just dough, but history, memory, and meaning.
Making Tradition Accessible
This recipe honors that tradition while reimagining it for modern needs. Whether it’s for Shabbat, a holiday, or just because you deserve fresh bread, this challah delivers the full experience—the aroma, the texture, the golden crust, the satisfaction of tearing into a warm slice—all without gluten. My mother-in-law, who grew up watching her own mother braid challah every Friday, gives this version her wholehearted approval. That’s the highest praise I can offer.
THE SCIENCE: How Gluten-Free Challah Actually Works
Understanding Gluten’s Role
Creating a gluten-free challah that rivals the traditional version requires understanding what gluten actually does. In wheat bread, gluten proteins form a strong, elastic network. This network traps gas from the yeast, allowing the dough to rise and creating that chewy, airy crumb we all love. Gluten provides both structure and stretch.
Without gluten, we need a new support system. We need ingredients that can mimic those properties—that can hold gas, provide elasticity, and create a tender crumb. This recipe builds that structure through a combination of key ingredients working together.
The Secret Weapon: Psyllium Husk
Psyllium husk is the true game-changer in gluten-free baking. According to Gluten-Free on a Shoestring, when psyllium husk absorbs water, it forms a viscous gel that acts remarkably like gluten. It provides the elasticity, structure, and moisture retention needed to hold the braid’s shape and prevent a crumbly texture.
Using whole psyllium husk (rather than powder) gives an even better, more “stringy” gluten-like network. The husks create tiny gel strands that trap gas and provide structure. This is what allows your braid to hold its shape and your loaf to rise properly.
The Cold Rise: Flavor and Handling
Refrigerating the dough for at least 4 hours (or up to 3 days) accomplishes two vital things. First, it slows down fermentation, allowing enzymes to break down starches and proteins. This develops a more complex, less “yeasty” flavor—the same principle behind slow-rise artisan breads.
Second, and perhaps more importantly for gluten-free bakers, chilling transforms the dough. Gluten-free dough is notoriously sticky and hard to handle. Chilling solidifies the fats and stiffens the psyllium gel, making the dough firm and pliable. Cold dough rolls into ropes without sticking to your hands. It braids cleanly without tearing. This single step separates frustrating gluten-free baking from successful gluten-free baking.
Baking Powder for Extra Lift
A small amount of baking powder provides an extra lift, helping to lighten the crumb. Gluten-free breads can sometimes be dense, and this gentle boost ensures a more open, airy texture. It’s insurance against heaviness.
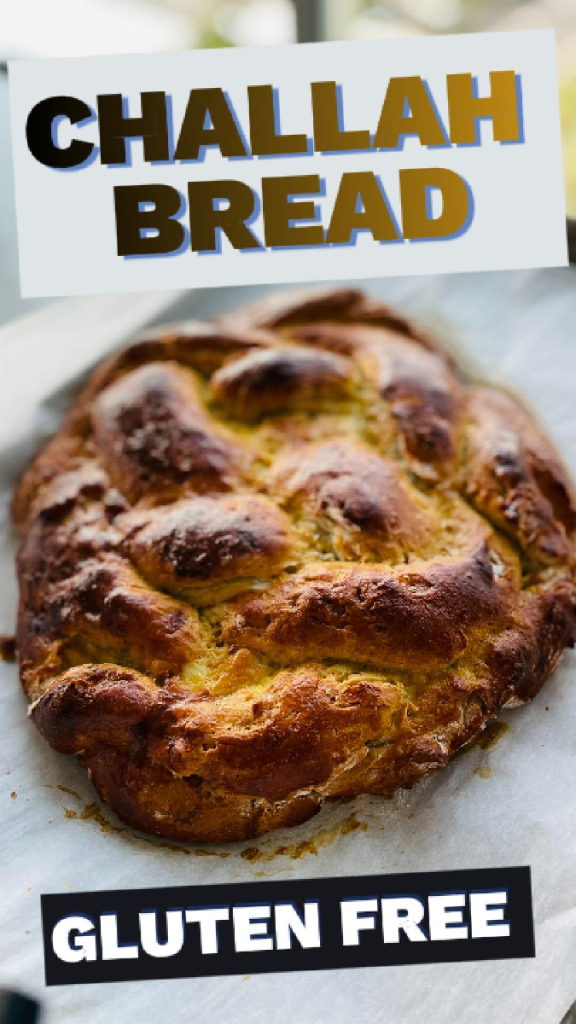
Triple Egg Wash: Building the Perfect Crust
The repeated egg wash isn’t just for show—though it certainly delivers beauty. The proteins in the egg wash undergo the Maillard reaction in the oven, creating that deep, glossy, golden-brown crust that is the hallmark of a beautiful challah. Applying it in multiple layers builds depth of color and that signature “challah shine.”
GOOD PAIRING FOOD AND DRINK
Appetizer: Smoked Fish Platter with Capers and Red Onion
Serve thick slices of warm gluten-free challah alongside smoked salmon, whitefish, or trout. Add capers, thinly sliced red onion, and a dollop of cream cheese (if dairy is welcome). The slightly sweet bread provides the perfect backdrop for the rich, briny fish. It’s a classic combination for a reason.
Main Course: Brisket or Roasted Chicken
This challah shines alongside traditional Jewish holiday mains. Use it to soak up the rich gravy from a slow-cooked brisket or the pan juices from a perfectly roasted chicken. The bread’s tender crumb absorbs every bit of flavor without falling apart.
Side Dish: Classic Tabbouleh Salad
The bright, fresh flavors of parsley, mint, tomato, and lemon in tabbouleh provide a wonderful contrast to the richness of challah. The herby, tangy salad cleanses the palate between bites of bread. It’s a refreshing counterpoint.
Dessert: Gluten-Free French Toast Casserole
Use day-old slices of this challah to create the ultimate gluten-free French toast casserole. Layer the bread in a baking dish, pour over a custard of eggs, milk, vanilla, and cinnamon, and let it soak overnight. Bake until puffed and golden. It’s a holiday morning dream.
Cocktail: Whiskey Sour
The bright citrus and slight sweetness of a well-made Whiskey Sour complement the eggy richness of the challah. The foam from the egg white in the cocktail echoes the bread’s own eggy character, creating a harmonious pairing.
Non-Alcoholic Drink: Spiced Apple Cider
Warm or cold, spiced apple cider with cinnamon and clove echoes the warm notes in the challah. The apple’s natural sweetness complements the bread’s subtle sugar, while the spices tie everything together beautifully.
Gluten-Free Challah Bread Recipe (My Mother-in-Law’s Secret) | Perfectly Braided & Golden
Description
After years of perfecting, my mother-in-law and I have created the ultimate gluten-free Challah. This recipe yields two beautifully braided, golden-brown loaves with a soft, tender crumb and a signature glossy crust. A genius cold-rise method makes the dough surprisingly easy to handle and braid, while psyllium husk provides the perfect gluten-free structure. Perfect for Shabbat, holidays, or a show-stopping centerpiece for any meal.
Ingredients
For the Dough:
For the Egg Wash:
Instructions
-
Mix the Dry Ingredients: In the bowl of a stand mixer fitted with the paddle attachment, whisk together the gluten-free flour blend, psyllium husk, sugar, baking powder, instant yeast, and kosher salt until thoroughly combined.
-
Add Wet Ingredients: With the mixer running on low speed, slowly pour in the lukewarm water, followed by the oil. Mix until the dough begins to come together. Add the 2 whole eggs and the extra egg yolk, one at a time, mixing until fully incorporated. The dough will look like a very thick, sticky batter.
-
Develop the Structure: Switch to the dough hook attachment. Mix on medium-high speed for 5 minutes. This step is crucial for activating the psyllium gel and building structure.
-
First Rise (Cold Fermentation): Scrape the dough into a clean bowl. It will be very sticky—that's perfect! Cover the bowl tightly with plastic wrap and refrigerate for at least 4 hours, but preferably overnight or up to 3 days. This cold rise is essential for flavor development and making the dough manageable.
-
Shape the Loaves (Braiding Day): Line a large baking sheet with parchment paper. Remove the chilled dough from the refrigerator. Lightly wet your hands to prevent sticking. Divide the dough in half. Working with one half at a time, gently knead the cold dough a few times until it becomes smooth and pliable.
-
Form the Strands: On a surface lightly dusted with gluten-free flour, pat or roll each dough half into a rectangle. Using a bench scraper or a knife, cut the rectangle into 4 equal strips. Gently roll each strip into a rope about 10-12 inches long. If the dough cracks, just press it back together—it's very forgiving!
-
Braid the Loaves: Lay the four ropes vertically and pinch them together at the top. For a 4-strand braid: take the far-right strand and cross it over two strands (so it goes over #2 and under #3, landing in the #2 spot). Then, take the far-left strand and cross it over two strands to the right. Repeat this pattern until the loaf is braided, then pinch the ends together and tuck them neatly underneath. Repeat with the second half of dough.
-
First Egg Wash & Proofing: Carefully transfer both braided loaves to the prepared baking sheet. In a small bowl, whisk together the egg, water, and a pinch of salt for the wash. Gently brush a thin layer of egg wash over the entire surface of each loaf. This first layer helps trap steam. Cover loosely with oiled plastic wrap or a clean kitchen towel. Let them rise in a warm, draft-free spot until puffy and almost doubled in size, about 30-45 minutes. Gluten-free dough won't rise as dramatically as wheat dough, so look for a noticeable increase in puffiness.
-
Preheat and Second Egg Wash: About 20 minutes into the proofing time, preheat your oven to 375°F (190°C). Just before baking, gently brush the loaves with a second generous layer of egg wash for that iconic glossy crust.
-
Bake: Place the baking sheet in the preheated oven. Bake for 20 minutes. Remove the sheet from the oven, brush the loaves with a third layer of egg wash, and immediately reduce the oven temperature to 325°F (165°C). Return the loaves to the oven and bake for another 20-25 minutes, until the challah is a deep, rich golden brown and sounds hollow when tapped on the bottom. If the top is browning too quickly, tent loosely with foil for the final 10 minutes.
-
Cool Completely: Transfer the loaves to a wire rack and let them cool completely before slicing. This is the hardest step, but it's essential for the crumb to set properly. The bread is life-changing when warm, but wait at least an hour for the best texture!

Nutrition Facts
Servings 12
- Amount Per Serving
- Calories 225kcal
- % Daily Value *
- Total Fat 7g11%
- Cholesterol 50mg17%
- Sodium 160mg7%
- Total Carbohydrate 36g12%
- Dietary Fiber 3g12%
- Sugars 11g
- Protein 5g10%
* Percent Daily Values are based on a 2,000 calorie diet. Your daily value may be higher or lower depending on your calorie needs.
Note
- Gluten-Free Flour Blend: Use a high-quality blend specifically designed for bread baking (such as King Arthur Measure for Measure, Bob's Red Mill 1-to-1, or Cup4Cup). Do not use a single flour like almond or coconut flour.
- Psyllium Husk: Whole psyllium husk is preferred over powder for better structure. If using powder, reduce the amount slightly as it absorbs more aggressively.
- Cold Dough is Key: Don't skip the cold rise! It transforms the dough from unworkably sticky to a pliable, braidable consistency. If the dough becomes too soft while braiding, pop it back in the fridge for 10 minutes.
- Dairy-Free: This recipe is naturally dairy-free. For a vegan version, you can experiment with egg substitutes, but the texture will be significantly different.
- Freezer Instructions: This bread freezes beautifully. Let it cool completely, then slice. Flash freeze slices on a baking sheet, then transfer to a freezer-safe bag. Toast slices straight from frozen for the best gluten-free French toast ever.