Intro
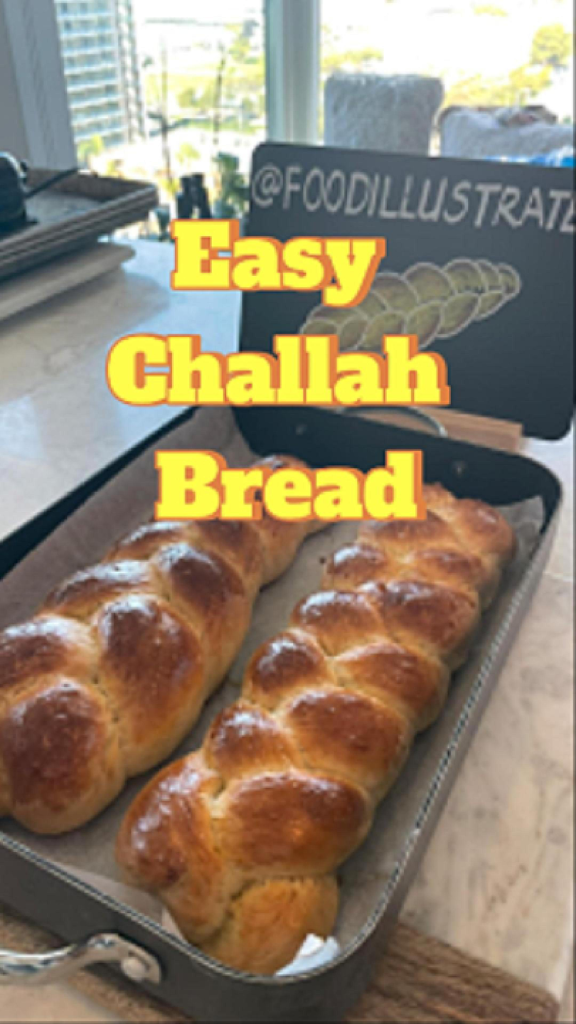
Is a 6-strand braid intimidating? What if you could make gorgeous, soft challah starting with an easy 3-strand braid? Today, I’m giving you both options for the perfect golden loaf, with all my foolproof tips for success. This complete guide will help you master the art of homemade Easy Challah Bread, whether you’re a first-time baker or looking to perfect your braid. The result is a beautifully golden, soft, and slightly sweet traditional egg bread every time. I’ll show you two braiding methods: a simple 3-strand braid for beginners and the classic 6-strand braid for a stunning bakery-style look. Perfect for Shabbat, holidays, French toast, or any day that calls for exceptional homemade bread.
The History
Challah, the ubiquitous Jewish Sabbath and holiday bread enriched with eggs, oil, and sugar, has a history as rich as its flavor. The word “challah” itself is ancient. In the Hebrew Bible (Numbers 15:17–21), it refers to a commandment to set aside a portion of dough (the chalah) as an offering to the priests . For most of Jewish history, this was the primary meaning of the word. It wasn’t until the 15th century that “challah” began to refer to the specific braided loaf we know today .
The iconic braided form evolved from a German and Austrian Sunday bread, which was adapted by Ashkenazi Jews for their Friday night Sabbath meal . The braid itself is rich with symbolism. The strands are thought to intertwine values like love, peace, and justice . The two loaves served on Shabbat commemorate the double portion of manna that fell from heaven before the day of rest, so the Israelites wouldn’t have to gather it on the Sabbath . Traditionally, the 12 “bumps” of a braided loaf represent the 12 loaves of the showbread offering in the ancient Temple of Jerusalem .
The Science
Creating that perfect pillowy soft and chewy challah is a beautiful lesson in gluten science and ingredient chemistry. The key to challah’s characteristic texture is the development of a strong gluten network. Gluten, formed when water hydrates the proteins in flour, creates the elastic structure that traps the gases produced by the yeast, allowing the bread to rise and giving it its satisfying chew .
Using high-protein bread flour, as recommended in this recipe, is essential because it provides more of the building blocks for this gluten network . The autolyse technique—letting the flour and water rest briefly after initial mixing—gives the flour time to fully hydrate and enzymes a head start on breaking down starches. This jumpstarts gluten development, leading to a dough that is easier to work with and a final loaf with a better-defined braid and lighter crumb .
The eggs and oil in challah do more than just add flavor. The fats from the egg yolks and oil tenderize the dough by coating some of the gluten strands, preventing them from becoming too tough. As Harold McGee explains in On Food and Cooking, eggs “supplement the gluten structure with tender protein coagulum” and also help “slow staling,” keeping your challah fresher for longer .
GOOD PAIRING FOOD AND DRINK
Appetizer: Classic Appetizer Platter with Hummus and Baba Ganoush
- Why: The soft, slightly sweet challah is the perfect vehicle for creamy, savory dips. The bread’s tender texture soaks up the bold, earthy flavors of the dips without falling apart, creating a wonderful contrast .
Main Course: Note: Challah is a bread, often served alongside a main. For a complete meal, serve it with: Hearty Chicken Soup or Beef Stew
- Why: Challah’s fluffy texture makes it the ideal companion for sopping up rich, flavorful broth. The subtle sweetness of the bread provides a comforting balance to the savory depth of the soup or stew .
Side Dish: As part of a Roasted Vegetable Medley
- Why: Pair thick slices of challah with a vibrant mix of roasted Brussels sprouts, carrots, and sweet potatoes. The bread’s softness beautifully contrasts the caramelized, crispy edges of the vegetables .
Dessert: Challah Bread Pudding with Vanilla Sauce or Fresh Berries
- Why: This is the ultimate way to transform leftover challah. Its rich, eggy dough is naturally suited to soaking up a creamy custard, resulting in a decadent, comforting dessert that’s far greater than the sum of its parts .
Cocktail: Aperol Spritz
- Why: The bright, bitter orange notes and effervescent bubbles of an Aperol Spritz cut through the richness of the challah, especially if you’re serving it with a savory meal. It acts as a perfect palate cleanser between bites.
Non-Alcoholic Drink: Sparkling Honey Lemonade
- Why: Honey is a traditional sweetener for challah, especially during Rosh Hashanah . A sparkling lemonade sweetened with honey echoes this flavor beautifully, with the bubbles and citrus providing a refreshing counterpoint to the bread’s richness.

Description
Master the art of homemade challah with this complete, foolproof guide. Learn two braiding methods—a simple 3-strand braid for beginners and a classic 6-strand for a stunning bakery-style look—to create a soft, golden, and slightly sweet loaf every time.
Ingredients
For Egg Wash & Topping:
Instructions
-
Make the Dough: In a large bowl, whisk together the flour, sugar, yeast, and salt. In a separate bowl or measuring cup, whisk together the eggs, oil, and warm water. Pour the wet ingredients into the dry and mix with a sturdy spoon or your hands until a shaggy dough forms.
-
Autolyse (Rest): Cover the bowl and let the dough rest for 15 minutes. This autolyse period allows the flour to hydrate, making the dough easier to knead .
-
Knead: Turn the dough out onto a lightly floured surface. Knead for 8-10 minutes until the dough is smooth, elastic, and no longer sticky. The dough should pass the "windowpane test" (a small piece can be stretched thin enough to see light through without tearing).
-
First Rise: Place the dough in a lightly greased bowl, turning to coat. Cover with plastic wrap or a clean kitchen towel and let it rise in a warm, draft-free spot for 1.5 to 2 hours, or until doubled in size.
-
Shape & Braid: Punch the dough down to release the air. Turn it out onto a work surface and divide it into two equal pieces for two medium loaves, or keep it as one for a single large loaf.
-
For a 3-Strand Braid: Divide one piece of dough into 3 equal parts. Roll each part into a rope about 14-16 inches long. Pinch the three ropes together at the top. Braid them: bring the right strand over the middle, then the left strand over the new middle. Repeat until you reach the end. Pinch the ends together and tuck them under the loaf.
-
For a 6-Strand Braid: Divide the dough into 6 equal parts and roll them into 16-inch ropes. Pinch the tops of all six strands together. Spread them out slightly. To braid: take the outermost strand on the right and weave it over two, under one, and over two. Then, take the outermost strand on the left and weave it over two, under one, and over two. Repeat until the loaf is braided, then pinch and tuck the ends .
-
Second Rise: Place the braided loaves on a parchment-lined baking sheet. Cover loosely with oiled plastic wrap or a clean kitchen towel. Let them rise for 45-60 minutes, until puffy (but not quite doubled).
-
Preheat and Egg Wash: Preheat your oven to 375°F (190°C). In a small bowl, whisk together the egg yolk and water. Gently brush the egg wash over the risen loaves. Sprinkle with your desired seeds.
-
Bake: Bake for 25-30 minutes, rotating the pan halfway through, until the challah is deep golden brown and sounds hollow when tapped on the bottom. For perfect doneness, the internal temperature should reach 190°F (88°C).
-
Cool: Transfer the loaves to a wire rack and let them cool completely for at least 1 hour before slicing. This is crucial for achieving the best texture.
Nutrition Facts
Servings 24
- Amount Per Serving
- Calories 180kcal
- % Daily Value *
- Total Fat 5g8%
- Total Carbohydrate 28g10%
- Dietary Fiber 1g4%
- Sugars 4g
- Protein 5g10%
* Percent Daily Values are based on a 2,000 calorie diet. Your daily value may be higher or lower depending on your calorie needs.
Note
- Flour Power: Using bread flour is highly recommended for the best structure and chew. All-purpose flour can be used, but the texture will be slightly less chewy.
- Room Temperature Ingredients: Using room-temperature eggs helps them incorporate into the dough more smoothly, creating a better emulsion.
- Don't Rush the Rise: The time for the dough to rise can vary based on the temperature of your kitchen. Look for the visual cues (doubled in size, puffy) rather than strictly watching the clock.
- Freezing: Challah freezes beautifully. Wrap the completely cooled loaf tightly in plastic wrap and then foil. Freeze for up to 3 months. Thaw at room temperature.
- Storing Leftovers: Store leftover challah in an airtight container at room temperature for up to 3 days. It makes the world's best French toast or bread pudding once it's a day or two old .