INTRO
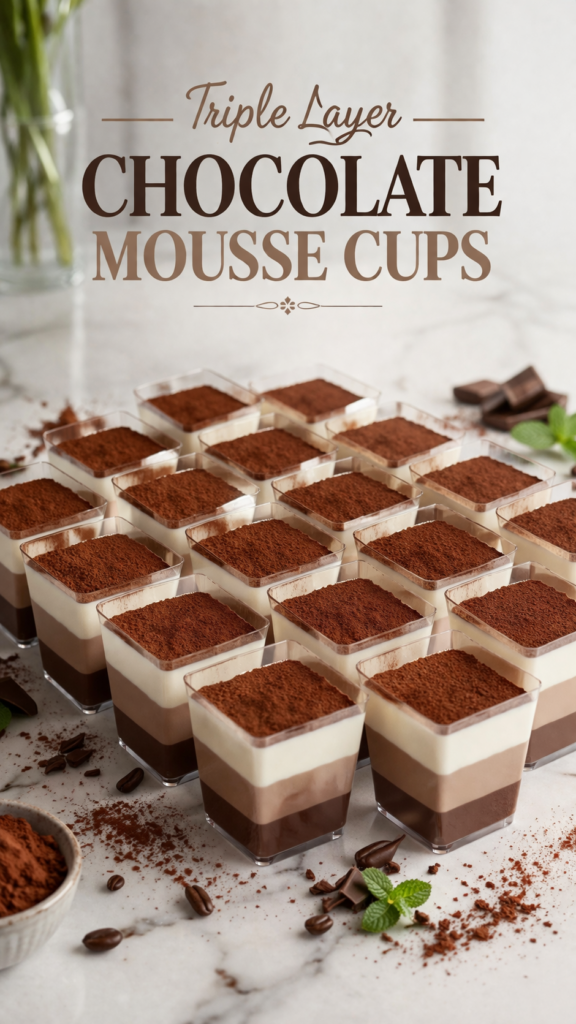
There is something undeniably magical about breaking through a silky layer of cocoa-dusted dark chocolate. Beneath it lies a creamy milk chocolate center. Then comes a cloud-like white chocolate finish. These triple layer chocolate mousse cups are the ultimate make-ahead dessert. They shine at dinner parties, holiday tables, or any time you need a sophisticated sweet escape.
Unlike complicated baked cakes, this recipe uses a simple microwave melting technique. A cold-set method delivers professional patisserie results in your home kitchen. Each square cup offers a distinct flavor journey. You start with a slightly bitter, intense top. Then you move to the sweet, vanilla-kissed bottom. This dessert proves you don’t need an oven to create show-stopping treats.
THE HISTORY
The word “mousse” translates from French to “foam.” This name perfectly describes a dessert that relies on trapped air bubbles for its ethereal texture. Today, we associate mousse with elegant chocolate desserts. But its origins are surprisingly savory.

In the 18th century, French chefs began incorporating whipped cream into meat and vegetable preparations. They also used egg whites. These techniques created light, airy dishes. The shift to sweet mousses didn’t happen until the late 19th century. This change was largely thanks to the rising popularity of chocolate in Europe.
By the early 20th century, French pâtissiers had perfected mousse au chocolat. They typically made it with raw eggs and whipped cream. The first written account of chocolate mousse in America appeared at a New York exposition in 1892. The recipe later found its way into the Boston Globe’s “Housekeepers Column” in 1897.
The three-tiered approach is a modern innovation. Dark, milk, and white chocolate layered together emerged in the 1980s and 1990s. This happened as white chocolate became more globally accessible. Interestingly, the artist Henri de Toulouse-Lautrec adapted an early French recipe called “mayonnaise de chocolat.” He included it in his posthumously published 1930 cookbook, “The Art of Cuisine.”
This stacked presentation speaks to our contemporary love of visual drama. It also satisfies our craving for contrasting flavor profiles. Today, these layered beauties are a staple in high-end buffets and home bakeries. People celebrate them for their make-ahead convenience and undeniable luxury.
External Link: Read more about the history of chocolate mousse on Wikipedia
THE SCIENCE
Why does this recipe work so flawlessly? The answer lies in emulsification and fat stabilization. Chocolate is naturally hydrophobic. That means it repels water.
When you melt dark, milk, or white chocolate with whole milk, you create a stable emulsion. This is a water-in-oil mixture. The milk proteins (casein) act as emulsifiers. They coat the microscopic cocoa butter and sugar particles. This allows them to suspend evenly in the liquid.
Cooling this mixture before combining with whipped cream is critical. If the chocolate mixture is warm, it will melt the cream’s fat structure. This deflates your mousse into a dense soup.
The second scientific pillar is the role of double cream. Double cream contains 48% fat. When you whip it, you trap air bubbles within a network of fat globules. Then you gently fold the cooled chocolate-milk base into this foam. You are adding flavor and structure without bursting those precious bubbles.
The 10-minute freezer rests between layers are not just for convenience. They rapidly chill the surface fat. This creates a semi-solid “skin.” That skin prevents the layers from bleeding into one another. This thermal layering technique ensures perfect stripes of color and flavor in your triple layer chocolate mousse cups.
External Link: Explore the food science of mousse on ScienceDirect
GOOD PAIRING FOOD AND DRINK
Appetizer (Savory Start)
Classic Creamy Mushroom Soup (Roux Method for Perfect Texture)
The earthy, umami richness of mushroom soup provides a warm, savory opening that gently awakens the palate. The silky, creamy texture of the soup mirrors the mouthfeel of the mousse layers to come, creating a cohesive dining experience from starter to dessert.
Main Course (Flavor Contrast)
Moist Turkey Meatloaf with Mushrooms and Shallots
The savory, herbaceous depth of this turkey meatloaf stands up beautifully to the intensity of the 70% dark chocolate layer. The umami from the mushrooms and shallots offers a deep, earthy counterpoint that cleanses the palate between bites of sweet milk and white chocolate mousse.
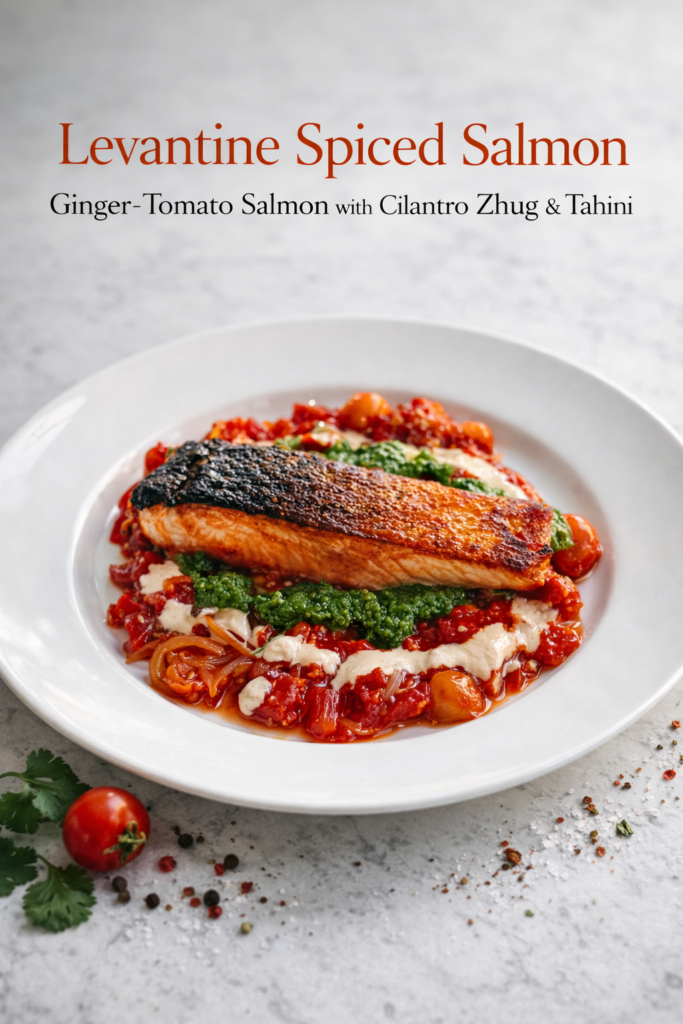
Levantine Spiced Salmon with Ginger, Tomato, Zhug & Tahini
For a lighter but equally bold main course, this spiced salmon delivers warming Middle Eastern spices, bright ginger, and nutty tahini. The spice heat and citrusy zhug cut through the richness of the double cream, while the salmon’s natural oiliness complements the cocoa butter in the chocolate.
Side Dish (Refreshing Crunch)
Crispy Fried Enoki Mushrooms
This unexpected side dish adds a textural masterpiece to your meal. The ethereal, shattering crispiness of fried enoki mushrooms provides a dramatic contrast to the silky, creamy mousse cups. A light dusting of flaky salt on the mushrooms enhances the sweetness of the white chocolate layer below.
Dessert (Sweet Harmony)
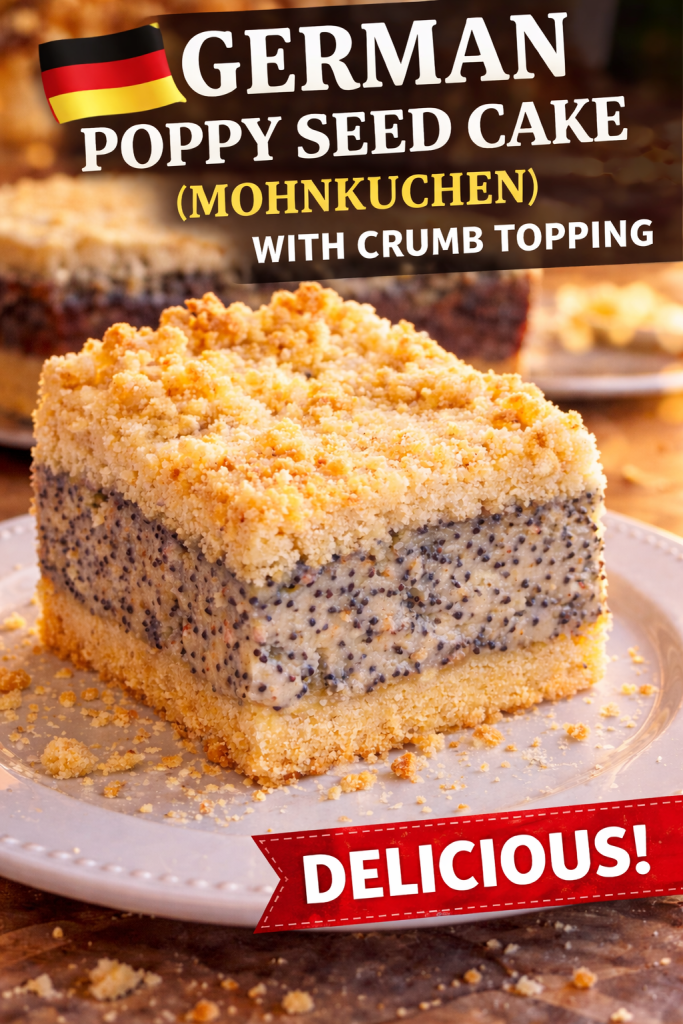
German Poppy Seed Cake (Mohnkuchen with Crumb Topping)
If you cannot get enough of layered desserts, this traditional German poppy seed cake is a stunning companion to the mousse cups. The nutty, slightly earthy flavor of poppy seeds and the buttery crumb topping provide a completely different texture profile—dense and crumbly versus light and airy—making for a well-rounded dessert spread.
Cocktail
Kir Cocktail
The blackcurrant notes from the Crème de Bourgogne in a classic Kir provide a sharp, fruity contrast that brightens the palate between bites of dense chocolate.
👉 Internal Link: Learn how to make the perfect Kir Cocktail
Non-Alcoholic Drink
Toasted Oat Milk Latte (Iced)
The nutty, slightly sweet flavor of oat milk with a shot of decaf espresso complements the chocolate and adds a cozy, roasted note.


Description
These triple layer chocolate mousse cups deliver a stunning visual and flavor contrast in every bite. With a bitter dark chocolate top, a creamy milk chocolate center, and a sweet white chocolate base, this no-bake recipe yields 20 individual square cups using simple microwave techniques.
Ingredients
For the Dark Chocolate Mousse
For the Milk Chocolate Mousse
For the White Chocolate Mousse
For Garnish:
Instructions
Prepare Your Plastic Square Cups & Dark Chocolate Layer
-
1. Prepare your cups. Arrange 20 individual plastic square cups on a baking sheet that fits in your freezer. Make sure they are stable and won't tip over.
2. Melt dark chocolate + milk. In a microwave-safe bowl, combine 180g dark chocolate and 140ml whole milk. Microwave on HIGH for 30 seconds. Remove and stir vigorously. Microwave again for 15 seconds, then stir. Repeat 15-second bursts until fully melted and smooth. Do not overheat or the chocolate will seize.
3. Cool the mixture. Place the bowl in your fridge for 10-15 minutes until it reaches room temperature or feels slightly cool to the touch. Crucial: If it's warm, it will melt your whipped cream.
4. Whip the cream. In a separate large bowl, whip 280ml double cream using a hand mixer or whisk until soft peaks form. The cream should hold its shape, but the tip flops over gently.
5. Combine. Pour the cooled chocolate-milk mixture into the whipped cream. Whisk gently JUST until combined. Do not overmix—you want a fluffy, airy texture.
6. Add optional cocoa (for color). If you want a deeper, darker top layer, sift 1 teaspoon of cocoa powder into the mousse and fold once.
7. Fill & freeze. Spoon or pipe the dark chocolate mousse evenly into your 20 plastic cups, filling each about one-third full. Tap the baking sheet gently on the counter to release air bubbles. Freeze for exactly 10 minutes.
Make & Add Milk Chocolate Layer
-
8. Repeat the melting process. In a clean bowl, melt 180g milk chocolate with 140ml whole milk using the same 30-second + 15-second microwave bursts. Cool in the fridge for 10 minutes.
9. Whip fresh cream. In another bowl, whip 280ml fresh double cream to soft peaks.
10. Fold. Fold the cooled milk chocolate mixture into the whipped cream.
11. Layer. Remove the cups from the freezer. The dark layer should feel firm to the touch but not rock-solid. Spoon or pipe the milk chocolate mousse over the dark layer, filling each cup to two-thirds full. Smooth the tops gently. Freeze for another 10 minutes.
Make & Add White Chocolate Layer
-
12. Final melt. Melt 180g white chocolate with 140ml whole milk using the same microwave method. Note: White chocolate scorches easily—use lower power if needed. Cool in the fridge.
13. Final whip. Whip the final 280ml double cream to soft peaks.
14. Final fold. Fold the cooled white chocolate mixture into the cream.
15. Complete the layers. Remove the cups from the freezer. Spoon or pipe the white chocolate mousse over the milk chocolate layer, filling each cup to the top. Smooth the surfaces beautifully.
Set & Serve
-
16. Long chill. Cover the cups loosely with cling film (plastic wrap) and refrigerate for at least 2 hours. Overnight (8-12 hours) is ideal for the best texture.
17. Dust & serve. Remove the cups from the refrigerator. Do not unmold. Generously dust the top of each cup with cocoa powder using a fine-mesh sieve. Serve immediately with a spoon.
Nutrition Facts
Servings 20
- Amount Per Serving
- Calories 485kcal
- % Daily Value *
- Total Fat 38g59%
- Saturated Fat 24g120%
- Sodium 55mg3%
- Total Carbohydrate 28g10%
- Dietary Fiber 2g8%
- Sugars 24g
- Protein 5g10%
* Percent Daily Values are based on a 2,000 calorie diet. Your daily value may be higher or lower depending on your calorie needs.
Note
Pro Tips for Success:
- Don't rush the cooling. If your chocolate-milk mixture is even slightly warm, it will deflate your whipped cream. The fridge cooling step is non-negotiable.
- Clean bowls between layers. Any residual dark chocolate in a bowl will muddy the color and flavor of your white chocolate layer.
- The hot knife trick. For pristine squares, heat your knife under hot water and dry it completely before each cut. This melts through the mousse without dragging.
- Bitterness fix. If you dislike dark chocolate bitterness, add 1-2 tablespoons of icing sugar (confectioners' sugar) to the dark chocolate mousse after folding.
Make-Ahead & Storage:
- Fridge: Store finished square cups in an airtight container for up to 3 days. Dust with cocoa powder just before serving to prevent absorption.
- Freezer: These freeze beautifully for up to 1 month. Wrap individual squares in plastic wrap then foil. Thaw overnight in the fridge before dusting and serving.
Substitutions:
- Double cream substitute: Use heavy cream (36% fat) plus 2 tablespoons of mascarpone to mimic the stability of double cream.
- Whole milk substitute: Semi-skimmed works, but the mousse will be slightly less rich.
- Gluten-free: Most quality chocolates are gluten-free, but always check the label for barley malt or wheat derivatives.
Troubleshooting:
- Mousse is runny: Your chocolate mixture was too warm, or you over-whisked the cream into butter. Next time, chill longer.
- Layers are bleeding: The previous layer wasn't firm enough. Always freeze for the full 10 minutes.